Showing posts with label refurbished. Show all posts

DIY: 90's Demin


 Cut Out Shoulder Top
What You'll Need: 
Button Up
Scissors

 Use chalk or pin to locate shoulder area. Cut to your content.
Caution: Shoulder may get cold, add sweater**


Shortalls
What You'll Need:
Overalls
Scissors

Use Chalk or pin to find appropriate length. Cut at angle to create shortalls. 
Finally, decorate and distress to create finished look!


Scrunchie
What You'll Need:
Scrap Fabric
Elastic
Scissors
Glue/ Needle and Thread

Fold fabric in half, inside out; sew/glue along open edge making a tube. Turn tube right side out. Push elastic through tube until ends meet. Sew elastic and open ends together.
Rock your pony.


How I Style My Vintage Clothing


Vintage Floral Linen Top ($.50 Rummage Sale)
Flared Jeans ($5.00 Goodwill)
Wedges (Finger Hut)


Vintage Striped Button Up ($.25 Rummage Sale)
Denim Pinafore Dress ($1.00 Charity Shop)
White Platform Sandals ($.50 Rummage Sale)


Vintage Black Silk Peter Pan ($.25 Rummage Sale)
Dark Wash Skinny Jeans ($.75 Yard Sale)
Black Sandals ($.99 Goodwill)

5 buck bag: Haul

I recently went to a garage sale and found some gems. Now, before I get started, I know, garage sales... EEK! Honestly, just like thrift shopping, garage sales can be hit and miss, grody or a thrifter's paradise... you gotta give a little and take a little, giving it a chance. Seriously, you can find some really great items and for cheap. Okay, now that my rant is over, I found an amazing sale, $5 for an entire bag of name brand clothes. 
Here's what I found:

H&M
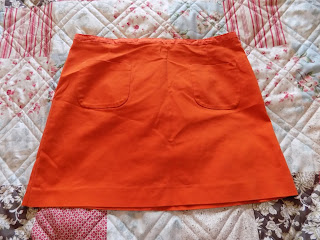
Burnt Orange is an essential color for any wardrobe but especially fall. When I saw this I was like, "I don't even care what size this is I need it." Luckily, it was my size and will make my fall essentials wardrobe so much better! I mean look at that color! SCORE!


Old Navy
This dress is super cute; it has a beaded top with a cinched waist making it very flattering. Unfortunately, it's a bit too big on me. To refurbish this dress I'm thinking of  making it into separates. Either way, it's going to be so adorable and super boho! HOLLA!


Very J
 Excuse the wrinkles, this tunic was too good to pass by. First of all, that color! I'm not much of a nude color kind of girl (because I'm super pale) but this top is fabulous! And it has studs! Like HELLO, yes please. With skinny jeans and wedges, this tunic is going to look amazing!


 Old Navy
 So I'm not really into muscle sweaters but this Old Navy top is everything. I wore this recently, pairing it with dark wash jeans, brown dangily earrings and sandals and let's just say it rocked my world. Boho at it's best! Plus, this is going to perfect for summer! 


Forever 21
I know what you're thinking, "A cardigan, really? It's like 100 degrees out!" This may be true but this oatmeal colored sweater just couldn't be left behind. Think of fall time, it will be so cozy and match everything, perfect for my future fall wardrobe!


My Story

 This dress, when I first held it up, I passed on it; It was weird and just didn't hang right. However, after sifting through the rest of the clothes I came back to this dress. On impulse, I bought it and I'm so glad I did. The front is really hard to show (the picture doesn't do it any justice), but this coral number is beautiful and flowy... not to mention the open back. Like, yes please; business in the front, party in the back!


 Gap
Finally, I picked up this white t-shirt.  I know what you're thinking, boring! However this basic essential is different from every other white tee because it has a v neck in the back and front making it more interesting than your everyday plain jane t-shirt.

DIY: Spring Restoration


 What You'll Need:
A Purse
Mod Podge
Paint Brush
Scissors
Fabric


Cut fabric into shape/design. Use the Mod Podge as glue and paste object onto purse. Add thick layer of Mod Podge over top of fabric as well. Continue cut and paste method, adding a thick layer of Mod Podge until your design is complete. Allow 30-45 minutes for glue to dry.


All Finished!

DIY: Sweatpants To Skirt


Do you ever have one of those days where pants just aren't going to work? How about those days when sweatpants are the only thing you can wear? If this is ever you, I have the perfect solution to your problem. 
The following DIY will explain how to turn your favorite pair of sweats (or any pair, because, you know, can't even think about cutting up those perfect pants) into a comfy but stylish skirt for those days when getting dressed is out of the question.

What You'll Need:
(1) pair of sweats
scissors
needle and thread or fabric glue 


 Begin by cutting sweats to the length you want your skirt to be, adding a an 1/2 inch for seam allowance. Next, cut inseams (the crotch seams).

 Turn inside out and flatten (once flattened the crotch seams should now be located on the right and left side [they are outside of the dotted lines in picture] and the original right and left leg should now be the front and back of the new garment). Use the dotted lines as guide to sew/glue to create new seams for skirt. Hem bottom. Turn right side out. 

Done!

DIY Valentine's Day

   Heart Breaker
What You'll Need:
acrylic paint (pink and gray)
paint brush
stencil (optional)


Start by painting a heart in the center of the shirt. Let dry for 15-20 minutes. Once dry, use stencil (free hand if you feel confident!) to  write "breaker". 


Houndstooth Hearts

What You'll Need
scrap fabric (I used houndstooth)
scissors
hot glue/glue gun


Mark where your elbow is on shirt. Next take scrap fabric and make a heart cutout (use size of hand to measure correct length). Glue heart to elbow area. 


Nautical Love

What You'll Need:
yarn 
hot glue/glue gun


Use yarn to make a word. Once configured glue in place.

DIY Sweater Updates

 Layered Look.


  Supplies:
Black Sweater
Plaid Button Up


Begin by removing the collar, bottom hem and cuffs 
(4 inches from bottom of sleeve) from the plaid shirt. 

Make sure to add a 1/2 inch to 1 inch  for seam allowance.

Sew all items onto black sweater as shown below (fabric glue could work too, just be careful when washing!). And you're all finished!


Reversed and Refurbished.


Supplies:
Black Sweater
Cardigan 

For this diy start with the cardigan open like shown above. Leaving the top 2 buttons buttoned,  remove the remaining buttons found on the cardigan. Finally, take your sweater and cut a triangle shape to fit the open part of your cardigan. 
Add a 1/2 inch to 1 inch for seam allowance.
Sew together (fabric glue could work too, just be careful when washing!). Here's the finished product!


Once a cardigan, now a cute, renovated sweater!
The back is flirty, yet work appropriate!