Showing posts with label skirt. Show all posts

5 buck bag: Haul

I recently went to a garage sale and found some gems. Now, before I get started, I know, garage sales... EEK! Honestly, just like thrift shopping, garage sales can be hit and miss, grody or a thrifter's paradise... you gotta give a little and take a little, giving it a chance. Seriously, you can find some really great items and for cheap. Okay, now that my rant is over, I found an amazing sale, $5 for an entire bag of name brand clothes. 
Here's what I found:

H&M
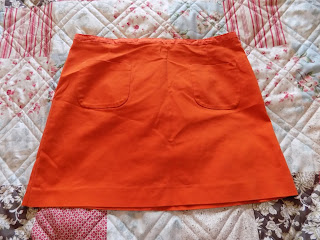
Burnt Orange is an essential color for any wardrobe but especially fall. When I saw this I was like, "I don't even care what size this is I need it." Luckily, it was my size and will make my fall essentials wardrobe so much better! I mean look at that color! SCORE!


Old Navy
This dress is super cute; it has a beaded top with a cinched waist making it very flattering. Unfortunately, it's a bit too big on me. To refurbish this dress I'm thinking of  making it into separates. Either way, it's going to be so adorable and super boho! HOLLA!


Very J
 Excuse the wrinkles, this tunic was too good to pass by. First of all, that color! I'm not much of a nude color kind of girl (because I'm super pale) but this top is fabulous! And it has studs! Like HELLO, yes please. With skinny jeans and wedges, this tunic is going to look amazing!


 Old Navy
 So I'm not really into muscle sweaters but this Old Navy top is everything. I wore this recently, pairing it with dark wash jeans, brown dangily earrings and sandals and let's just say it rocked my world. Boho at it's best! Plus, this is going to perfect for summer! 


Forever 21
I know what you're thinking, "A cardigan, really? It's like 100 degrees out!" This may be true but this oatmeal colored sweater just couldn't be left behind. Think of fall time, it will be so cozy and match everything, perfect for my future fall wardrobe!


My Story

 This dress, when I first held it up, I passed on it; It was weird and just didn't hang right. However, after sifting through the rest of the clothes I came back to this dress. On impulse, I bought it and I'm so glad I did. The front is really hard to show (the picture doesn't do it any justice), but this coral number is beautiful and flowy... not to mention the open back. Like, yes please; business in the front, party in the back!


 Gap
Finally, I picked up this white t-shirt.  I know what you're thinking, boring! However this basic essential is different from every other white tee because it has a v neck in the back and front making it more interesting than your everyday plain jane t-shirt.

St Patrick's Day Outfit Ideas


Simple on St. Patrick's Day

 T-Shirt: Old Navy $.99
Jeans: Thrift Shop $5.00
Sandals: Thrift Shop $1.00
Total: $7.00


Stylin' on St. Patrick's Day

 Sweater: Goodwill $3.99
Skirt: Wet Seal $4.00
Shoes: Online $3.00
Total: $11.00


Spring on St. Patrick's Day

 Shirt: Goodwill $3.99
Jeans: Gordmans $12.99
Sandals: Rue 21 $3.00
Total: $20.00


DIY: Sweatpants To Skirt


Do you ever have one of those days where pants just aren't going to work? How about those days when sweatpants are the only thing you can wear? If this is ever you, I have the perfect solution to your problem. 
The following DIY will explain how to turn your favorite pair of sweats (or any pair, because, you know, can't even think about cutting up those perfect pants) into a comfy but stylish skirt for those days when getting dressed is out of the question.

What You'll Need:
(1) pair of sweats
scissors
needle and thread or fabric glue 


 Begin by cutting sweats to the length you want your skirt to be, adding a an 1/2 inch for seam allowance. Next, cut inseams (the crotch seams).

 Turn inside out and flatten (once flattened the crotch seams should now be located on the right and left side [they are outside of the dotted lines in picture] and the original right and left leg should now be the front and back of the new garment). Use the dotted lines as guide to sew/glue to create new seams for skirt. Hem bottom. Turn right side out. 

Done!

DIY Circle Skirt

DIY Circle Skirt


 I've seen circle skirts/ skater skirts all over the place. I've also seen the prices attached to them, EEEEK! I just can't fathom paying 25(+) dollars on piece of material. So for today's tutorial we're going to making our own skirts, that are affordable, cute and so EASY!


 Step 1.) Start with folding fabric in half, then into fourths.


 Step 2.) From the folded corner, mark your measurements (measure your waist and then divide by 6.28.... so if you have a 39 inch waist, divide by 6.28. 6.21 will be where your mark your first arc).


 Step 3.) Now from the first arc, measure how long you want your skirt to be plus and extra inch for seam allowance, mark it and cut both arcs (I used 15 inches for length and seam allowance).


 Step 4.) Cut slit in pattern, will be used for later alterations. Flip skirt inside out, mark hem and iron down. From here you could sew hem, however, if sewing isn't in the books, I used No Sew fabric glue.


 Step 5.) To make the waistband take waist measurement, 39 inches, by 6 inches. Once done, fold in half and iron. (This is where you can add inches if skirt is too short. Just make waistband more than 6 inches!)


Step 6.) Attach waistband to skirt by matching one waistband edge to inside of skirt.  Fold waistband on crease and attach other side of waistband material. The second picture shows finished product. (If this is difficult, just make sure no edges are showing on either the skirt or waistband.. this means matching sides so no edges are seen!). Connect skirt at slit.


 Finished Product!


This is what the waistband should look like! Sorry for the dirty mirror!
Here's a side view!